1977 Super Decathlon 8KCAB Rebuild

Bartman

Administrator
Staff member
Joined
Mar 27, 2018
Messages
3,711
Location
New Jersey, USA
That looks great. I'd like to make a new one too
Ed, they get about $125 for a new one at ACA but I couldn't buy it because I didn't understand why my bracket with the nutplates wasn't lining up with the slot in the tray I had with the project. It's nice to have some 7ECA spar wood in the 8KCAB project but if I knew for sure it was going to fit I probably would have just bought a new one.

Making stuff is fun and very satisfying though so who knows. I can send you the old one if you want to copy it and have it ready.
 

Big Ed

N50247 - '79 Super D
Joined
Jul 20, 2020
Messages
1,938
Location
Tampa, FL
Ed, they get about $125 for a new one at ACA but I couldn't buy it because I didn't understand why my bracket with the nutplates wasn't lining up with the slot in the tray I had with the project. It's nice to have some 7ECA spar wood in the 8KCAB project but if I knew for sure it was going to fit I probably would have just bought a new one.

Making stuff is fun and very satisfying though so who knows. I can send you the old one if you want to copy it and have it ready.
Thanks. I'll probably just pull mine out and copy it so I know it will fit. Not going to do anything until next winter when I finish implementing the electrical service letter.

Mine has a weird cutout for clearance with one of the belly stringers. Not sure I have room for the circuit breaker with it.
 

Bartman

Administrator
Staff member
Joined
Mar 27, 2018
Messages
3,711
Location
New Jersey, USA
Mine has a weird cutout for clearance with one of the belly stringers. Not sure I have room for the circuit breaker with it.
like this one does?

1680721522685.png

I didn't see that cutout in the factory one I saw last week so I didn't do it to the new one. The extra room is needed to mount the battery and starter solenoids there so maybe it's ok to not do the cutout? I also bought the electrical kit so that's going to go together next week when I'm home from work.
 

Big Ed

N50247 - '79 Super D
Joined
Jul 20, 2020
Messages
1,938
Location
Tampa, FL
like this one does?

View attachment 3890

I didn't see that cutout in the factory one I saw last week so I didn't do it to the new one. The extra room is needed to mount the battery and starter solenoids there so maybe it's ok to not do the cutout? I also bought the electrical kit so that's going to go together next week when I'm home from work.
Yes, same. Looks to me like it is for clearance with the stringer end. Maybe not needed, I'll have to give it a closer look when I get ready to go do the project. Maybe the spine of the stringer can be shaved down.

PXL_20210627_213448411~2.jpg
 

Bartman

Administrator
Staff member
Joined
Mar 27, 2018
Messages
3,711
Location
New Jersey, USA
I'll tell you what, I am much more gentle taking fuel from that rear drain on my Citabria now that I know it's a brass tube in an adel clamp and that there's basically no sump for the drain to draw from!!!

I see what you mean about that stringer being there. If you're heading to the factory soon maybe you can look into it and get some more photos or ask Dale? 🤔
 

Bartman

Administrator
Staff member
Joined
Mar 27, 2018
Messages
3,711
Location
New Jersey, USA
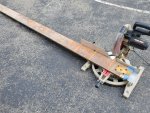
It was with regrets today that I reduced one of Giuseppe Bellanca's formerly proud 8KCAB front spars to a lowly belly stringer! My set was short one and rather than order another and then wait a week, I milled one from the old spar. The old spar had tip damage so it wasn't going to ever fly again.
20210725_165836.jpg

One from the set was used as a guide and by the end of the day they all had a first coat of poly and were put away to dry. :)

ACA uses regular old Minwax satin polyurethane to seal wood parts so that's what I used.

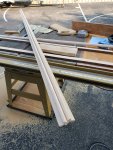
Rough cut and then sanded to the finish profile.
20210725_182316.jpg

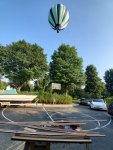
Low pass by one of the local balloon ride operators
20210725_183201.jpg

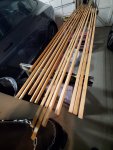
set to dry for the night
20210725_205311.jpg

Next they'll be fitted then given another coat and any mounting holes or cuts will be sealed up. The goal is to get everything ready for fabric by Nov 1 so the colder months can be for wiring up avionics and finishing the panel. If an engine comes through, hopefully it will be ready to be hung by spring and then we are talking about wings and final details before it flies!
 
Last edited:

Bartman

Administrator
Staff member
Joined
Mar 27, 2018
Messages
3,711
Location
New Jersey, USA
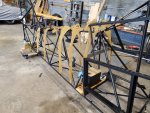
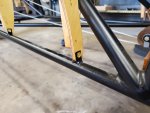
Back at it this morning, formers are done, moving on to finalizing the stringers.
20210829_092719.jpg20210829_092707.jpg

The idea of using brass eyelets for the formers struck me a few weeks ago and I took the challenge to heart! Formers have been attached with eyelets since the Aeronca Champ days so I thought it was something I'd have to figure out for the good of the project and it is a lot lighter than using AN3 hardware for all of those attach points!

20210829_092734.jpg20210829_092745.jpg

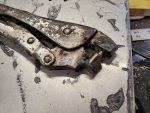
A little web sleuthing and it was found the eyelets are #8 size which is 1/4" diameter. The dies for setting the eyelets came from a holster crafting site, the Made in the USA vice-grips came from my garage. my tig tacks are getting a little better. :)
 
Last edited:

Bruce

Well-known member
Joined
Dec 22, 2018
Messages
439
Location
Knoxville TN
Looking good ur impressive with the detail, the more I watch I’m impressed with with the results. As for the weight saving back when I ran Legend cars I remember using half lock nuts on bolts barely long enough trying to reduce weight so I could shift weight to the left side of car. ( searching for a tenth of second a lap) my bird is only going to be a fair recover compared to what your doing keep up the updates I’m hoping to get back to mine next month. I’d really like to have it flying by Christmas with any luck.
 

Bartman

Administrator
Staff member
Joined
Mar 27, 2018
Messages
3,711
Location
New Jersey, USA
stringers are pretty much done, ground plane for the comm antenna has been fitted, studs and tabs for the overhead electrical panel have been ground out and the first test fit of the headliner is moving along. here are a few pics, i'm going to bed. :)

20210904_170236.jpg

20210907_143753.jpg20210907_210203.jpg20210907_214438.jpg20210907_214420.jpg
 

Bartman

Administrator
Staff member
Joined
Mar 27, 2018
Messages
3,711
Location
New Jersey, USA
Just put a deposit check in the mail for a new set of wings! Crazy to be even thinking about it but the lead time is substantial so now it's time to get to work. Except, there's that little detail of having two more weeks of training for work. Plenty to do and lots of parts on hand so go-time has arrived (in two weeks, doh! want to work on airplane now!) !
 

Bartman

Administrator
Staff member
Joined
Mar 27, 2018
Messages
3,711
Location
New Jersey, USA
the website says 50% but lead times are out there pretty far so I asked for something more reasonable and we agreed to $5000 per wing.

and the powder coating shop called to say my rudder pedals are ready so I really don't want to have to go back out tonight!
 

Bartman

Administrator
Staff member
Joined
Mar 27, 2018
Messages
3,711
Location
New Jersey, USA
The last time I was at ACA I saw a tote of raw rudder pedals that hadn't been machined or powder coated black yet. It got me thinking that bare aluminum ACA pedals would pair up ok with my like new bare aluminum Bellanca pedals. So I asked Chad to send me a pair of front pedals when they got back from the machine shop but before they went to the powder coater.

When I got them the bare aluminum of the old pedals didn't really match up to that of the new pedals so they were all powder coated a satin silver color.

Not bad, right?

The new pedals are much more heavy duty than the old ones making them better suited for the front. The rear pedals keep a nice nod to the days of Bellanca and are there if anyone ever needs them.

20211023_125321.jpg20211023_141853.jpg
 

Hiperbiper

Well-known member
Joined
May 30, 2020
Messages
680
Location
Shreveport Louisiana DTN
They say the old pedal design had a nasty habit of getting the front seat belt wrapped over the rear toe brake pedal which could cause a problem if not caught on the ground...the new design didn't have the seat belt grabbing problem. Nice looking design too.
Chris
 

Bartman

Administrator
Staff member
Joined
Mar 27, 2018
Messages
3,711
Location
New Jersey, USA
They say the old pedal design had a nasty habit of getting the front seat belt wrapped over the rear toe brake pedal which could cause a problem if not caught on the ground...the new design didn't have the seat belt grabbing problem. Nice looking design too.
Chris
I've never heard that but I can see how it might happen. The old pedals also have a reputation for bending, more the top part under heavy braking or too much push when setting the parking brake. Unbranded old-style pedals are available new but it didn't seem like the right thing to do which is why I went with the new ones. The ACA pedals are much heavier, like maybe double the weight of the old ones but they're not going to bend!
 

Big Ed

N50247 - '79 Super D
Joined
Jul 20, 2020
Messages
1,938
Location
Tampa, FL
There was an accident in an early Decathlon attributed to the front seat belt snagging on a rear pedal. I think it resulted in an AD or SL, but I don't recall the details.

If you are braking hard enough in a taildragger to bend the pedals, you are asking for a nose over. The only time I brake with more than very brief and mild force is during run-up. I probably overdo it a bit then, but sometimes it slips a bit. Lately I have taken to using the parking brake, which does not slip when correctly applied.
 

Bartman

Administrator
Staff member
Joined
Mar 27, 2018
Messages
3,711
Location
New Jersey, USA
My old Instructor said if you were using brakes on rollout in a TD you were asking for trouble...Just Saying
I definitely agree with that but I think the problem with the old pedals is in the geometry of them. If you apply the brakes hard from the back, you're twisting the rear brake pedals to send the force forward to the front pedals where the master cylinders are. As that force comes forward to the front pedals, they're twisting the opposite direction to push on the master cylinders. It's an awkward path for those forces to have to travel and I'd guess some of the lore of bent rudder pedals isn't so much heavy feet but aggressive braking from the back having to twist and push and untwist as it makes its way forward and all of these pivot points are just bolts through metal, no bearings to make things move more easily.
 

Bob Turner

Well-known member
Joined
Apr 4, 2018
Messages
2,864
No wonder I have trouble feeling brakes in the back.
Yes, the seatbelt can snag, but surely that is corrected by the PIC before taxi? I have four hunks of seatbelt that can snag, but putting them on involves clearing the rear pedals. Wish I had heel brakes.
And always remember, sudden heavy braking at low speed causes serious problems. Jam one on, you shear a valve stem. Jam both on you buy a new prop. And these days a new engine.