Hi all,
Have new formers and stringers but, since I didn't remove the old ones, I'm lacking forward visibility as to how they get attached. It looks like machines screws and nylocks where they bolt to the tabs but is there a gouge anyone can offer as to how the stringers are wired to the formers? Gauge of wire? Went looking in the projects area for photos but didn't enough to really map things out. Photos would be a huge plus!
Thanks in advance.
Bart


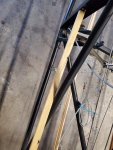
") ). Note the use of rivets to hold the formers to the frame, a nice little weight savings from the factory. Sorry no greenhouse photos
). Note the use of rivets to hold the formers to the frame, a nice little weight savings from the factory. Sorry no greenhouse photos