aftCG
Well-known member
Finally a section for us defectors!
Early this spring just as 2020 drove into the ditch I swung a deal for a previously started Kitfox 5 with pretty much every 7 modification (or so it seemed. more on that much later). I've been itching to build my own airplane most of my life and was in the market for a project very similar to what I ended up with when I decided "ah screw it, I'll just buy a flying aircraft and go". And no regrets! I've put almost 300 hours on the plane since buying it. It has polished my tailwheel technique considerably, and my short field game in an amazing way. Prior the annual starting recently I was spinning the plane routinely and looking forward to some aerobatic instruction.
I love my Citabria. It has been very reliable, not very expensive to fly and it is always enjoyable. The only thing I don't love about my Citabria is that I can't swing wrenches on it legally. Avionics are so much cheaper on the experimental side. I don't need permission from the King to move my turn coordinator one hole over, or adjust the Kollsman thingy on my alitimeter.
When I ended up with a few bucks in my pocket early in the year it was finally time to act. I watched the ads for a while and one day found a freshly posted ad for the plane I now own. The only trouble was, it was in Ohio and I'm in Washington. Things about my project that I liked was that it came with a complete FWF kit for a Rotax 912 (over $6k), enough Oratex covering to do the job (another $6k+) some high dollar options like aero struts and some lower dollar but still not free options like fiberglass leading edge, extended baggage, Alaskan Bushwheel tail wheel (Scott 3200), single piece windshield and skylight.
With airline travel screeching to a halt in March I took it on faith that the aircraft was represented accurately. The owner sent walk around videos, a complete inventory and disclosed all the known defects. Fortunately he was an honest guy and what arrived undamaged fit the description exactly. In another stroke of luck there was a truck driver/GA pilot at his airport that like to fill his empty back hauls headed west. For less than the cost of airfare for me and my son to Ohio, my Kitfox arrived in front of my hangar in early April.
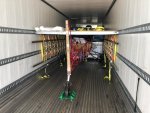
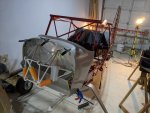
Shown above just the way it arrived.
Okay so the known defects:
Were considerable. First, the owner told me he screwed up when he was drilling the wing spars for the strut attach fittings. The front and rear spars on the Kitfox are aluminum tubing, but in the later models there is a long piece of aluminum extrusion that can best be described as the shape of the Batman emergency signal in the sky. When he drilled the holes into that internal extrusion it was too close to one edge, leaving insufficient edge margin for the rivets that follow. The builder purchased new wing spars and extrusions and shortly after that decided he wasn't going to complete the aircraft.
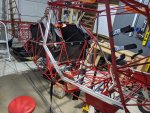
The second defect was that that sexy red powder coating was done in the late 90s, and it was not flawless. I'm assured that powder coating has come a long ways since then. The builder decided he was going to strip the fuselage bare, strip the powder coating and have it all done up fresh. I was in alignment with that idea until I had the plane in my hands about a month
I researched powder coating shops in my area. I learned that while powder coating has come a long ways, environmental restrictions on removing powder coating have made the job difficult and expensive. The only place in my area that would touch an aircraft told me I would have to strip most of it off myself, and they would be able to finish it up and put new powder on for about $1850.
That same previous builder went over the entire fuselage finding where the powder coating was loose, removed it, addressed any surface corrosion and then used two part epoxy primer with a brush. It didn't look pretty but it addressed the biggest flaw of 4130 chrome moly tubing, which is that it will rust quickly if left exposed.
In stripping the fuselage of components the previous owner removed the wood ribs in the vertical fin, destroying them in the process. He also removed a bunch of other components with less than graceful results. I was at a crossroad on how to proceed. Over 95% of the powder coating was just fine. Really nice in fact. The manual also had several areas where it instructs you to grind away the powder coating for bonding, touch up after drilling holes, etc. There was also the issue of some welding which wouldn't be required but would be a really good idea.
The welding
There were two areas on the design of the Kitfox 5 that have been updated on the series 7 that is produced now. One is some triangle gussets that need to be welded to the rudder pedal torque tubes, and the other is a reinforcement where the tail wheel leaf spring attaches by the rudder post. The third area was one I discovered while I was getting familiar with the build process, and that was where one of the two previous owners fabricated the rudder pedal mounting brackets incorrectly - and then drilled matching holes in the fuselage. I would have to have those holes welded up, grind them smooth and then prime/paint/clear coat them.
In the end I decided that I would not strip the powder coating. Along the way I discovered that my local auto body shop sells a two part rattle can epoxy primer from Germany You break an internal seal, shake for 2 minutes and you have 4 days to use it up. Amazing! The same shop can also color match anything from a sample and provide a really nice single part rattle can (also from Germany) and a two part clear coat to go over it, which only lasts a day after you combine the two parts.
I found a guy on Craigslist who could weld 4130. He teaches the A&P program at a community college, does welding on the side and also pilots a King Air 350 for some company. I bought the weld rod he specified from Aircraft Spruce and loaded up my project and took it to his shop. $150 later the welding was done.
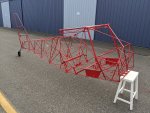
Naively I assumed that would be the last of my priming and painting. I've long since given up on that ideal and I'm super glad I didn't waste my time doing fresh powder coating.
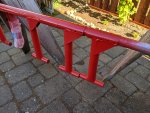
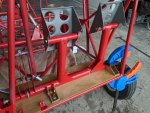
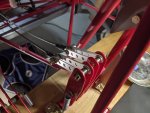
Rudder pedal torque tubes with the added 4130 gussets and freshly painted.
Early this spring just as 2020 drove into the ditch I swung a deal for a previously started Kitfox 5 with pretty much every 7 modification (or so it seemed. more on that much later). I've been itching to build my own airplane most of my life and was in the market for a project very similar to what I ended up with when I decided "ah screw it, I'll just buy a flying aircraft and go". And no regrets! I've put almost 300 hours on the plane since buying it. It has polished my tailwheel technique considerably, and my short field game in an amazing way. Prior the annual starting recently I was spinning the plane routinely and looking forward to some aerobatic instruction.
I love my Citabria. It has been very reliable, not very expensive to fly and it is always enjoyable. The only thing I don't love about my Citabria is that I can't swing wrenches on it legally. Avionics are so much cheaper on the experimental side. I don't need permission from the King to move my turn coordinator one hole over, or adjust the Kollsman thingy on my alitimeter.
When I ended up with a few bucks in my pocket early in the year it was finally time to act. I watched the ads for a while and one day found a freshly posted ad for the plane I now own. The only trouble was, it was in Ohio and I'm in Washington. Things about my project that I liked was that it came with a complete FWF kit for a Rotax 912 (over $6k), enough Oratex covering to do the job (another $6k+) some high dollar options like aero struts and some lower dollar but still not free options like fiberglass leading edge, extended baggage, Alaskan Bushwheel tail wheel (Scott 3200), single piece windshield and skylight.
With airline travel screeching to a halt in March I took it on faith that the aircraft was represented accurately. The owner sent walk around videos, a complete inventory and disclosed all the known defects. Fortunately he was an honest guy and what arrived undamaged fit the description exactly. In another stroke of luck there was a truck driver/GA pilot at his airport that like to fill his empty back hauls headed west. For less than the cost of airfare for me and my son to Ohio, my Kitfox arrived in front of my hangar in early April.

Shown above just the way it arrived.
Okay so the known defects:
Were considerable. First, the owner told me he screwed up when he was drilling the wing spars for the strut attach fittings. The front and rear spars on the Kitfox are aluminum tubing, but in the later models there is a long piece of aluminum extrusion that can best be described as the shape of the Batman emergency signal in the sky. When he drilled the holes into that internal extrusion it was too close to one edge, leaving insufficient edge margin for the rivets that follow. The builder purchased new wing spars and extrusions and shortly after that decided he wasn't going to complete the aircraft.
The second defect was that that sexy red powder coating was done in the late 90s, and it was not flawless. I'm assured that powder coating has come a long ways since then. The builder decided he was going to strip the fuselage bare, strip the powder coating and have it all done up fresh. I was in alignment with that idea until I had the plane in my hands about a month
I researched powder coating shops in my area. I learned that while powder coating has come a long ways, environmental restrictions on removing powder coating have made the job difficult and expensive. The only place in my area that would touch an aircraft told me I would have to strip most of it off myself, and they would be able to finish it up and put new powder on for about $1850.
That same previous builder went over the entire fuselage finding where the powder coating was loose, removed it, addressed any surface corrosion and then used two part epoxy primer with a brush. It didn't look pretty but it addressed the biggest flaw of 4130 chrome moly tubing, which is that it will rust quickly if left exposed.
In stripping the fuselage of components the previous owner removed the wood ribs in the vertical fin, destroying them in the process. He also removed a bunch of other components with less than graceful results. I was at a crossroad on how to proceed. Over 95% of the powder coating was just fine. Really nice in fact. The manual also had several areas where it instructs you to grind away the powder coating for bonding, touch up after drilling holes, etc. There was also the issue of some welding which wouldn't be required but would be a really good idea.
The welding
There were two areas on the design of the Kitfox 5 that have been updated on the series 7 that is produced now. One is some triangle gussets that need to be welded to the rudder pedal torque tubes, and the other is a reinforcement where the tail wheel leaf spring attaches by the rudder post. The third area was one I discovered while I was getting familiar with the build process, and that was where one of the two previous owners fabricated the rudder pedal mounting brackets incorrectly - and then drilled matching holes in the fuselage. I would have to have those holes welded up, grind them smooth and then prime/paint/clear coat them.
In the end I decided that I would not strip the powder coating. Along the way I discovered that my local auto body shop sells a two part rattle can epoxy primer from Germany You break an internal seal, shake for 2 minutes and you have 4 days to use it up. Amazing! The same shop can also color match anything from a sample and provide a really nice single part rattle can (also from Germany) and a two part clear coat to go over it, which only lasts a day after you combine the two parts.
I found a guy on Craigslist who could weld 4130. He teaches the A&P program at a community college, does welding on the side and also pilots a King Air 350 for some company. I bought the weld rod he specified from Aircraft Spruce and loaded up my project and took it to his shop. $150 later the welding was done.

Naively I assumed that would be the last of my priming and painting. I've long since given up on that ideal and I'm super glad I didn't waste my time doing fresh powder coating.

Rudder pedal torque tubes with the added 4130 gussets and freshly painted.
