1975 7KCAB Restoration

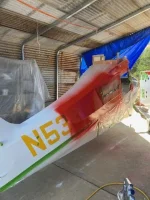
Fuselage is through 2cd coat of Colorado Red. N53844 is back on the map.

Stencils pull best after 2 hours. I tried taping over areas of stensil where there small bubbles to prevent them from running/creasing/growing which caused small overspray on my tail feathers. What I found was the taping on top of stensil "locked" the stensil and fabric tauntness underneath it in place. After pulling stensil, I could see an impression on the fabric. See picture below. After the several hour cure the tautness of the area evened and problem resided.

Ive recently changed spray guns from a 1.5mm gravity feed to a 2qt pressure pot system with a 1.7mm tip. I would recommend nothing smaller for recover jobs. Best 170$ ive spent so far. Found on amazon. Astro 2PG8S. Ive found my best settings to be 40-42psi at gun w 10-12 in pot. For a higher gloss Butyrate finish I mix colored dope 4:1 with J-3000. Then thinner 4:1 with reducer. Optimal temp is 65. Will polish with a 3M product "Perfect-it" then wax w Carnuba Wax when all is done then update.

Worth noting that I still see my brush marks from first coat of Nitrate in certain bays where I overlapped and around stubborn tapes. My thought was the silver phase was going to be my saving grace in that I could keep silvering and sanding until glass finish, then topcoat. That really isn't the case. Even though the surface is perfectly smooth from sanding, you mostly see the defect by a change in gloss/ depth. My extra strokes of Nitrate around tapes/ corners translates to a deeper and glossier topcoat finish. Looking back, more blending Nitrate passes around those areas would have helped.

Let me know if you have any questions about spraying/ stensil placement.

Next is localized repair on wings. Mostly around inspection panels. Stripping to base fabric for repairs.


IMG_2220.jpgIMG_5221.jpg
(Approved jacking method)...

IMG_5223.webp
IMG_5226.jpg
tape.jpg
Change in tautness due to tape
IMG_5258.jpg
 

Attachments

  • IMG_5223.webp
    IMG_5223.webp
    65 KB · Views: 3
Good morning everyone, hope all is well. Posting an update and have a few questions.

Switched gears from dope to other items as summer temps hit. Firewall and boot cowl got the attention they needed, engine is hung and routed (mostly), rear windows are in.

Will need a support/clamp arrangement running down the landing gear struts to route the rigid brake lines. I've seen zip ties do it.....not a fan. Also clamps that grab the back edge of struts on other GA planes. These seem to ruin the paint and primer in a hurry. What is your setup?

Will be recovering a wing. Blanket or envelope? Pros, cons?

Can someone send a picture of their parking brake and control routing to it?

IMG_5487.webp

IMG_5499.webp

IMG_5682.webp

IMG_5693.webp

IMG_5695.webp

IMG_5705.webp
 
Looks very nice. Blanket is my preference, and now Dacron comes wide enough for legal seams fore and aft.

For clamps, find a Cessna 180 and duplicate those. Just metal straps.
 
Gentlemen, Merry Christmas.

Attached is photo of removed tailwheel arm/ rudder steering arm, springs, and associated hardware.

Stamped on arm is BA216. IPC calls for a 3-1619. Unsure if number on arm is part number or cast number. Also, spring assemblies are not in IPC. It calls for a single spring PN: 2-1525. What is your spring setup? Guessing these different springs were installed as minor alt being they are on other similar tailwheel planes. Unsure.

Let me know what you think. If anyone has an arm that has an alt number, or 3-1619 stamped on it that would help as well. Thanks in advance.

IMG_0009.jpg
 
Last edited:
Still would like a photo of a parking brake and control routing to it next time someone has their floor out. Figure 26 in IPC leaves a lot to be desired... thanks!
 
A lot of folks swear by those differential compression springs. I personally use the standard matched pair on all my taildraggers.

The secret is angle of the kingpin, damping, and proper inflation. When none of those cure the shimmy, it is time for new parts inside the tailwheel. Those springs simply aren’t part of the equation.

Opinion.
 
While I am at it - also opinion - I disconnect or wire open most parking brake setups on light aircraft like these. I have seen far too many inadvertent actuations.
 
Response to the below post - I have no idea why folks like the compression springs. I know I have flown them; I just do not recall any handling improvement.

they can theoretically “bottom out,” perhaps breaking something in the process.

The differential spring deal is to disrupt harmonic motion (shimmy). But what disrupts harmonic motion is damping - in our case, tightening that nut under the fork and above the tire. Not too much, or taxiing becomes difficult.
 
Last edited:
Fuselage made it out of the garage! The wing recovering adventure starts this weekend..

I ended up backfilling the perimeter of top and bottom cowl with glass to have a fresh slate. Brought back the 1/4 turn camloc style attachment with original hole placement...only real difference is installed phillips for the studs vs the original slotted. Skybolt sells a Citabria cowling kit, adjustable depth receptacles for always a flush install! No long, mismatched, or short studs for your cowl anymore.... fancy.
Experimented with Superfil on cowl as well on chipped/cracked areas and would recommend 👍. Transitioned to multiple high build primer coats, sanding, then finish with Randolph Enamel in Insignia White.

My yet to fly aircraft suffered damage on the vertical stab several weeks ago from a storm that blew through the valley.... after the fuss was over I chose a very appropriate lighting bolt patch for the repair. Adds to cruise speed im sure.


The procedures manual calls out that newly sprayed colored butyrate blends very easily with the original. I found that to be the case after making a few adjustments to my dope mix. My first passes with Colorado Red, J-3000, butyrate thinner, and reducer (typical mix) left a powerful overspray that discolored the original finish around my spraying swath. The fix was only spraying the colored butyrate with thinner...nothing additional. Essentially the highest pigment mix. This reduced that "buffer zone" greatly. I guess another solution would be to just tape the area off real well and have 0 overspray...then live with tape lines. Few shadows to deal with now....hoping polishing blends it out.

New windshield, skylight are in. Went with original style wellnuts for windshield attachment. Only small change was size 6 stainless screws for windshield retainer instead of pop rivets.

Made the slow and steady trip to the airfield to free up some space in the shop... switching gears to a wing recover.

Would love some tips/ advice/ direction. What to do, not to do, things to look for etc. 👍

Thank you all!


Cowl 1.jpg
Cowl 2.jpg
Cowl 3.jpg

Patch 2.jpg
Patch 3.jpg
Patch 4.jpg
Patch 5.jpg
IMG_0187.jpg
IMG_0023.jpg
IMG_0093.jpg
IMG_0213.jpg
IMG_6017.jpg
 
I went the other way - 10-32 screws, dimpled washers, and floating nutplates. Takes longer, but much better fit.

I found that Colorado Red was quite good when it was made in Carlstadt, New Jersey, but when Randolph sold out, the same color was really transparent. At least the color was the same, unlike the yellows and whites.
 
Gentlemen, hope you are all well.

Few factors have changed my "recover" to a rebuild. Spars R2 due to overall dryness and age. Original from 1975, no compression or longitudinal cracks. Damage on bottom edge...can see in photo attached. 3 cracked ribs.

I have heard only great remarks on Millmans aluminum spar conversion kit and hope to build a wing at some point in the future using it. That being said, this left wing will have Rainbow Rons PMA'd spars installed. Couple reasons: 1. My right wing has Rons spars in it, recovered in 09. Only makes sense to marry the pair, not have an aluminum left wing and a wooden right. 2. Its historically correct being the original type design is wood.

Along with new spar purchase will be the STC screw kit, means of approval to use PK screws instead of nails for rib-spar attachment (i know....so much for liking original type design).

In the meantime will treat all aluminum with a phosphoric acid cleaner, BONDERITE C-IC 33 AERO
Then conversion coating, BONDERITE M-CR 1201 AERO (formerly Alodine 1201)

Has anyone installed Rainbow Rons Spars? Any roadblocks anybody foresee that I do not?

Appreciate all input.

IMG_0239.webp


IMG_0240.webp

IMG_0260.webp

IMG_0269.webp

IMG_0380.webp

@Bartman Is it possible for you to change thread title from current "fuse recover" to 1975 7KCAB Restoration. Thank you
 
Hopefully you can do your own spar inspection. Paying shop rates to remove and replace all those inspection plates could get costly.
 
Hopefully you can do your own spar inspection. Paying shop rates to remove and replace all those inspection plates could get costly.
Hold a current A&P IA, so no shop rate for maint/inspections. Im sure the radio install/ ADSB compliance in the next phase will be costly though. Still unsure if I will take that on or outsource. Not a wire guy..
 
Wire got really simple lately. They don't make them any more, but the Garmin 200 com was trivial. Hardest part was soldering the jacks after threading the wires up through the left windshield post.

You can buy a harness for the transponder/encoder interface, and the Tailbeacon needs only power and ground.

The biggest hassle is after the pins are crimped on getting them in the correct holes. Check, and double-check. The pins are supposed to come out with the proper tool, but mine sure don't.
 
Speaking of current IA - this year we are getting a letter. Nobody at the FSDO really looked closely at the letter, which demands that you also have a little yellow ticket. It doesn't say it has to be signed, so keep your old one.
 
Bob, not sure what the point is on the written I.A. letter. They made a strong point of saying it was more critical to have the letter of approval, but they also said hold onto the card. I'm holding comment on that but you can probably guess what I might say. Not rocking the boat.

Cheers, Brian
 
Back
Top