You are using an out of date browser. It may not display this or other websites correctly.
You should upgrade or use an alternative browser.
You should upgrade or use an alternative browser.
1977 Super Decathlon 8KCAB Rebuild
- Thread starter Bartman
- Start date
yes, "ground plane" is confusing when it's in a conversation that is also discussing "grounding". electrical "bonding" shouldn't be confused with "bondage" which is more personal in nature outside the scope of this website! lol
yes, "ground plane" is confusing when it's in a conversation that is also discussing "grounding". electrical "bonding" shouldn't be confused with "bondage" which is more personal in nature outside the scope of this website! lol
And that a ground plane does not need to be grounded, but it may need to be bonded.
In the instance of a GPS antenna, it's really not a ground plane anyways, it's just a mounting surface, right?
Backside (frontside?) of the panel, started wiring and figuring out the remaining details. The basis for the set up is the ACA electrical system drawing that I purchased from the factory combined with the schematic in the parts manual for my '77. The main power feed from the alternator/battery side of things will attach at the crossover links the two bus bars and then power will exit out the top of the upper switch breakers and CB's and also out the bottom of the lower CB's. The factory set up is very similar, just different for the specific equipment that they'd put in a new plane like a Garmin G3X which I'm not using.
By the way, all of this work uses up way more wire than you'd guess when you're first ordering stuff!
Hey Bart, did you buy your breakers from ACA? Do you have the brand and part #?
champ guy
Active member
That looks like quite a project! The fuselage sure looks nice all cleaned up and primed with new formers. I am working on my 76 Decathlon and am ready to run the wiring bundle back to the breaker/switch panel.
I have a completely installed the headliner and the fabric on the wing root area of the fuselage. Should this sheathed bundle go through the headliner at the very front and then run to the breaker panel or should it go around the outside of the semi vertical fuselage tube and then through the wing root fabric to reach the panel? Your thoughts or pictures would be appreciated.
I have a completely installed the headliner and the fabric on the wing root area of the fuselage. Should this sheathed bundle go through the headliner at the very front and then run to the breaker panel or should it go around the outside of the semi vertical fuselage tube and then through the wing root fabric to reach the panel? Your thoughts or pictures would be appreciated.


Hiperbiper
Well-known member
Also remember when routing your wires to leave enough slack around the turns to keep the wires from pinching or abraiding over time.
And an extra bit of wire between the last mounting point of the wire bundle and the switches/breakers/gauges is desirable for future servicing...the factory used the bare minimum length of wire due to cost concerns, now that money is no object feel free to do a better job!
And keep wires that carry power away from your coax (antenna) cables...
Chris
champ guy
Active member
Thank -You both for the pictures and advice. This is my bucket list airplane and it has to be correctly done.
I finally got word that I am able to get finishing materials from Airtech coatings again after a three month supply chain wait.
I put the new starter ring gear on yesterday and it worked just like the Lycoming service letter said it would!
Jeff
I finally got word that I am able to get finishing materials from Airtech coatings again after a three month supply chain wait.
I put the new starter ring gear on yesterday and it worked just like the Lycoming service letter said it would!
Jeff
Attachments


That looks like quite a project! The fuselage sure looks nice all cleaned up and primed with new formers. I am working on my 76 Decathlon and am ready to run the wiring bundle back to the breaker/switch panel.
I have a completely installed the headliner and the fabric on the wing root area of the fuselage. Should this sheathed bundle go through the headliner at the very front and then run to the breaker panel or should it go around the outside of the semi vertical fuselage tube and then through the wing root fabric to reach the panel? Your thoughts or pictures would be appreciated.
I'm afraid I wouldn't have pics that could help as I didn't disassemble the plane so existing condition photos are non-existent and I've moved all of the electrical switches and stuff to the panel, eliminating the need for the overhead switch/breaker panel.
champ guy
Active member
Thank-You. I did not disassemble my airplane either and it leaves more things to figure out. Big Ed sent the picture I needed. I sure like the look of what you are doing with the panel. I am committed to the stock setup at this point.
Spoke to Chad yesterday and he mentioned that the radio ground plane did need to be grounded, though I suspect he meant bonded.
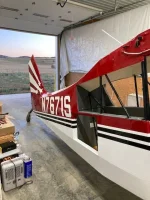
Either way, that was apparently part of the rationale for moving the location of the antenna mount. The old location was mounted to wood and bonded to the frame with brass wire, which explains the crazy brass wiring in the attached pics. The new location makes direct contact with the metal frame, which I assume means one of the roof former mounting lugs should be bare.

Either way, that was apparently part of the rationale for moving the location of the antenna mount. The old location was mounted to wood and bonded to the frame with brass wire, which explains the crazy brass wiring in the attached pics. The new location makes direct contact with the metal frame, which I assume means one of the roof former mounting lugs should be bare.
Trying to get the fabric done but when the supplies are at the hangar I have to find something to do in the evening back home! It's a Ringmaster Jr and I'm trying to catch the Annual Ringmaster Fly-A-Thon's rain date this weekend since it rained this past weekend. Someone hogged out the nose and put a .35 in it so I'm fixing it up to get a .19 like it is supposed to have. It was given to me like ten years ago and I never did anything with it.
 ringmasterflyathon.com

The horizontal stab frame makes a great support while the epoxy dries. Thursday and Friday are going to be hot enough outside to do fabric work at the hangar so I'm planning to hit it all day and do as much as I can. The belly fabric is on and half done, I should have a pic of that instead of that little U/C plane!
Annual Ringmaster Fly A Thon Annual Worldwide Ringmaster Fly-A-Thon - Annual Ringmaster Fly A Thon
To report your results Push/Click the blue button below!This will take you to the 2023 16th Annual Fly-A-Thon report page! PUSH THE BUTTON Now is the time to plan for the 16th, 2023 Fly-A-Thon!Mark your Calendar for:October 7-8, 2023 when we will fly together AGAIN! 2023 Fly-A-Thon Logo and...
The horizontal stab frame makes a great support while the epoxy dries. Thursday and Friday are going to be hot enough outside to do fabric work at the hangar so I'm planning to hit it all day and do as much as I can. The belly fabric is on and half done, I should have a pic of that instead of that little U/C plane!
Last edited:
Got the bottom fabric done today so it's time to finish up a lot of the other details that will need to be in and final before the side fabric can be installed.


the wiring harness gets support from one of the lower stringers but the turn up towards the battery tray is a little tight so I had to make a small relief cut to give the wires more room. going back in the morning to keep knocking stuff off the punch list and then it will all get inspected Tuesday before we go ahead with the side fabric panels!


the wiring harness gets support from one of the lower stringers but the turn up towards the battery tray is a little tight so I had to make a small relief cut to give the wires more room. going back in the morning to keep knocking stuff off the punch list and then it will all get inspected Tuesday before we go ahead with the side fabric panels!
Last edited:
I took @Big Ed 's advice and pressure tested the new fuel lines for leaks. Everything looks good, it is holding 20 lbs for a few minutes now.

A plug of RTV in the end of the line before pressing it closed with a vice grip seems to have worked fine.

brass fittings from the hardware store and a schrader valve did the trick.

A plug of RTV in the end of the line before pressing it closed with a vice grip seems to have worked fine.
brass fittings from the hardware store and a schrader valve did the trick.
champ guy
Active member
That looks like a good way to check the lines. I may wait until I get everything hooked up and then apply a couple of ounces to the whole system.
Thanks,
Jeff
Thanks,
Jeff
Jeff,That looks like a good way to check the lines. I may wait until I get everything hooked up and then apply a couple of ounces to the whole system.
Thanks,
Jeff
yes, definitely don't put 20 pounds to the lines with the fuel tanks installed. people use a balloon as a pressure gauge and just apply enough air to blow up a balloon on one of the lines. i figured Ed used 20 pounds without tanks and got away with it so I'd be safe! it's the internet, right?
champ guy
Active member
Bartman,
I like the balloon idea. I had trouble finding a really accurate low-pressure gauge when I checked my fuel tanks before recovering. The balloon would readily show pressure loss safely.
Thanks,
Jeff
I like the balloon idea. I had trouble finding a really accurate low-pressure gauge when I checked my fuel tanks before recovering. The balloon would readily show pressure loss safely.
Thanks,
Jeff
Bob Turner
Well-known member
- Joined
- Apr 4, 2018
- Messages
- 4,019
I note the ancient model a few frames back. I know nothing about Mono Kote, but am trying to restore a fallen "Rebel" (looks like a Fly Baby with cantilevered wings).
The stuff is tough - I got most of the filth off with lots of Dawn dish washing stuff - but it is still dingy. Any hints? Can I just over-spray it with butyrate dope?
The stuff is tough - I got most of the filth off with lots of Dawn dish washing stuff - but it is still dingy. Any hints? Can I just over-spray it with butyrate dope?
the header is sheet aluminum, i am not so sure it is as indestructible as you think. the fuel tanks, especially the older citabria tanks are not at all suited for pressure.Aluminum tubing is rated to at least 2600 psi. Flared fittings are rated to at least 5000 psi. The header tank is built like a tank. Your air compressor is going to fail before you damage anything.