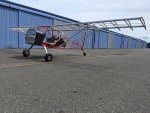
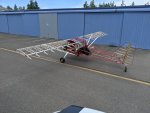
My Kitfox build

aftCG

Well-known member
Joined
Apr 3, 2018
Messages
526
Location
Tacoma, WA
Regarding my engine choice, I just found some videos for perspective. First up is an Aeronca Chief with the Verner 7 cylinder radial.

And here is the 7 cylinder Verner of the South African knock off of the Kitfox
 

aftCG

Well-known member
Joined
Apr 3, 2018
Messages
526
Location
Tacoma, WA
Celebrated the "ready for cover"stage of my Kitfox build recently. Moved it to the airport with the help of my youngest son where it is tucked in behind my Citabria while I commence to building wings.
Decided to launch a youtube channel specific to my radial powered Kitfox to include building and flying it. It's geared towards people who are at least considering building their own plane.


Explorer

Well-known member
Joined
Aug 21, 2020
Messages
157
Location
Pacific NW
aftCG,

We had a Citabria locally that was about 10 years old. On the elevators it was noticed that the tubing was corroded. The Fabric was pulled and I believe a couple of tubes replaced. It was suggested by the shop that did the repair that they prefer epoxy over powder coat.

Any thought's from you and the other contributors on what is preferred long term?

Thank you!
 

aftCG

Well-known member
Joined
Apr 3, 2018
Messages
526
Location
Tacoma, WA
aftCG,

We had a Citabria locally that was about 10 years old. On the elevators it was noticed that the tubing was corroded. The Fabric was pulled and I believe a couple of tubes replaced. It was suggested by the shop that did the repair that they prefer epoxy over powder coat.

Any thought's from you and the other contributors on what is preferred long term?

Thank you!
What I learned from my local powder coat shops when I was researching having my fuselage redone, powder coating has come a long ways in 20 years. It still has limitations where several tubes intersect if there are any tight spaces, so careful inspection is required and any voids addressed - with epoxy naturally.

The Kitfox factory default is still powder coating but some builders elect to have frames shipped bare and they do their own epoxy. When I first started I was sure it would be impossible to match not only the red color but the surface texture. Surprisingly I have tubes that will be quite visible when seated that are 50/50 and I doubt anyone will be able to tell.

The old school airplane mechanics will tell you it's epoxy or go home.

I think it's still all about surface preparation since 4130 will show rust in mere minutes. When I moved my fuselage to my hangar a week or so ago I had the COM antenna platform located in place with Clecos. That piece was bare 4130 I had just stripped off the powder coating from. It rained on the plane during load/unload and there was visible rust on that piece when I wiped it down (a surprising amount). I think if you put either epoxy or powder coating on that piece without cleaning it up again it would be rusting underneath, sight unseen.
 

Bob Turner

Well-known member
Joined
Apr 4, 2018
Messages
2,864
My impression is that you give it a light sand blast, then immediately hit it with epoxy primer, like within minutes.

I did not have the bucks in 1969, so I sanded every tube, then primed with zinc chromate, then shot two part epoxy on it. Back then the epoxy cost ten bucks. It is still good today - a J3 - no rust. Stored outside for maybe 15 years since then. Flies every darn day, almost.
 

aftCG

Well-known member
Joined
Apr 3, 2018
Messages
526
Location
Tacoma, WA
My impression is that you give it a light sand blast, then immediately hit it with epoxy primer, like within minutes.

I did not have the bucks in 1969, so I sanded every tube, then primed with zinc chromate, then shot two part epoxy on it. Back then the epoxy cost ten bucks. It is still good today - a J3 - no rust. Stored outside for maybe 15 years since then. Flies every darn day, almost.
$10, I can barely get paint filters for that much now. And Zinc chromate is gone for any mere mortals. Thankfully the two part epoxy primer seems to work great.

The Kitfox manual is thorough in their explanation that 4130 needs to be coated immediately. For the pieces I have made so far I cut the metal, go after it with a scotch brite disc on my angle grinder, clean it quickly with acetone and then don't touch it with my fingers again.
 

aftCG

Well-known member
Joined
Apr 3, 2018
Messages
526
Location
Tacoma, WA
It has been a while since I posted in this thread. I'm well into framing up my left wing, and of course the right wing will go faster since I will have spent less time staring at the parts trying to work out a plan.
Sometime in the next few weeks I'll have to list my Citabria for sale, so I can use my hangar to set up the fuselage and wings and drill the strut attach fittings. I'll also need the hangar space to do much of the fabric work.

I realize now that I didn't mention my instrument panel. I'll be going with a pair of MGL MX1 displays, which will give me headless COM and TXP. The displays are fully customizable in almost every way, and their engine information system will be very easy to adapt to my Czech built engine.

I still need to pick my prop, and that will have an impact on my landing gear/tire choice since the engine is capable of swinging 82" of wood. Right now I'm leaning towards a 78x53 which is still more prop than my Citabria has (72x54 I think).

sideview for paintscheme planning 3.jpg
This lame image shows what my plane will look like with my custom boot cowl. That's the oil tank down below, which I'll will be faked in to look like an oil cooler (I'm copying Steve Wolf's Samson Mite)
 

aftCG

Well-known member
Joined
Apr 3, 2018
Messages
526
Location
Tacoma, WA
Finishing the frame up of my slow build wings. I'll be attaching them to the fuselage and rigging the wing lift struts, drilling the spars for the lift strut attach fittings (probably the most worrisome task of the entire build) in April and then I'll start covering.
 

aftCG

Well-known member
Joined
Apr 3, 2018
Messages
526
Location
Tacoma, WA
I have everything rigged for drilling up the root of the forward spar and two pilot holes in each lift strut attach fitting. I don't love the way the manual has you drill up that wing root hole (it's blind) so I just dropped a McMaster Carr order for some bar stock and some slip fixed renewable drill bushings.

And in the "here's why I went experimental" category, my MGL avionics order showed up yesterday. My entire panel (minus my transponder) was $7200 which includes prefabricated wiring harnesses clear out to the headset jacks. I could not have purchased basic VFR steam gauges and a used GPS/COM for what I have in this panel. The only reason I held off on the transponder was to reduce the melting plastic smell on my wallet. I will be going with a Sandia of some type (I forget the model as I type this) because it integrates so well with the MGL displays.
PXL_20210506_002204252(1).jpg
That is going to be a very clean panel. That's a pair of fully customizable EFIS, engine monitor and moving map GPS. No floppy wires, no velcro, no tablet on a docking station. Fly from either seat with full capability.

Redundant displays, each with its own WAAS GPS, air data, AHARS, etc. 760 channel COM with built in intercom. The transponder won't add any clutter (because it will be headless) and if I add a NAV radio it won't either. Built in AoA with three options (two with probes and one no-probe option which works the way the Uavionix does). I'm now strongly considering the electronic circuit breaker feature which will de-clutter my panel even further.

You might be wondering how you can check oil pressure upon engine start since most of us are trained to turn on the avionics master later on. Well these displays are essentially impervious to voltage spikes and tolerate a wide range of input voltage, so I can power these up prior to engine start.
 

Hiperbiper

Well-known member
Joined
May 30, 2020
Messages
680
Location
Shreveport Louisiana DTN
If you're looking for a transponder, Uavionx has the new SkybeaconX mode S transponder, ADS-B in and out, Wi-Fi intergrated and can be controlled by your new MGL EFIS(s). The whole thing mounts where the tail nav light goes. No transponder in the panel at all (cause it looks like space it kinda tight...).
Chris
 

Bartman

Administrator
Staff member
Joined
Mar 27, 2018
Messages
3,711
Location
New Jersey, USA
If you're looking for a transponder, Uavionx has the new SkybeaconX mode S transponder, ADS-B in and out, Wi-Fi intergrated and can be controlled by your new MGL EFIS(s). The whole thing mounts where the tail nav light goes. No transponder in the panel at all (cause it looks like space it kinda tight...).
Chris
it isn't just an analog to digital blipper in the tail anymore? now it's the whole in/out transponder in that little mounting hole?
 

Bartman

Administrator
Staff member
Joined
Mar 27, 2018
Messages
3,711
Location
New Jersey, USA
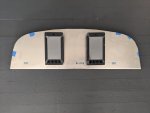
I have everything rigged for drilling up the root of the forward spar and two pilot holes in each lift strut attach fitting. I don't love the way the manual has you drill up that wing root hole (it's blind) so I just dropped a McMaster Carr order for some bar stock and some slip fixed renewable drill bushings.

And in the "here's why I went experimental" category, my MGL avionics order showed up yesterday. My entire panel (minus my transponder) was $7200 which includes prefabricated wiring harnesses clear out to the headset jacks. I could not have purchased basic VFR steam gauges and a used GPS/COM for what I have in this panel. The only reason I held off on the transponder was to reduce the melting plastic smell on my wallet. I will be going with a Sandia of some type (I forget the model as I type this) because it integrates so well with the MGL displays.
View attachment 3612
That is going to be a very clean panel. That's a pair of fully customizable EFIS, engine monitor and moving map GPS. No floppy wires, no velcro, no tablet on a docking station. Fly from either seat with full capability.

Redundant displays, each with its own WAAS GPS, air data, AHARS, etc. 760 channel COM with built in intercom. The transponder won't add any clutter (because it will be headless) and if I add a NAV radio it won't either. Built in AoA with three options (two with probes and one no-probe option which works the way the Uavionix does). I'm now strongly considering the electronic circuit breaker feature which will de-clutter my panel even further.

You might be wondering how you can check oil pressure upon engine start since most of us are trained to turn on the avionics master later on. Well these displays are essentially impervious to voltage spikes and tolerate a wide range of input voltage, so I can power these up prior to engine start.
thanks for explaining all of that. how long did it take for you to come to your current equipment selections?
 

aftCG

Well-known member
Joined
Apr 3, 2018
Messages
526
Location
Tacoma, WA
If you're looking for a transponder, Uavionx has the new SkybeaconX mode S transponder, ADS-B in and out, Wi-Fi intergrated and can be controlled by your new MGL EFIS(s). The whole thing mounts where the tail nav light goes. No transponder in the panel at all (cause it looks like space it kinda tight...).
Chris
Ha! Super tight. The path I've been going down is the Sandia STX 165R which is a headless mode C, and then add the Echo UAT which is also a Uavionix product. I've been trying to avoid the tail beacon like the plague because I'm trying to eliminate wiring to the tail, and that includes a position light in the tail (I was hoping to use modern LED wing tip position/strobes which have the white light to the rear to meet that requirement).

I just looked up the TailbeaconX and it's $2500, whereas the Sandia+Echo UAT comes up to $3050. More importantly the tail beacon weighs 140 grams (20 ounces). Looking at the spec sheets the Sandia + Echo UAT would be 46 ounces - and obviously no wiring/coax is included for this comparison. I would lose some of that weight advantage because there are currently no provisions in my rudder for the rear position light. Kitfox offers a fairing for the job which would require some body and fender work and make the rudder more challenging to cover with fabric.

I'll just say thanks for pointing it out and that the TailbeaconX is at least on the short list. It would definitely be a clean install and you are correct that the MGL EFIS will run it.

thanks for explaining all of that. how long did it take for you to come to your current equipment selections?
Probably around 8 months. In one of my videos I recount how I kept evaluating Garmin and Dynon (because those choices are "normal" and well proven), but no matter how I sliced up the components needed to install either a single large display (hate the idea for several reasons) or two smaller ones for just VFR with a single COM it comes up to $22-25K, which seems crazy.

I originally discounted the MX1 displays because they seemed small. Until I was flying around one day in my Citabria with the iFly 740b and realized they are about the same size - and right there in your face. I don't understand the trend towards a 10" EFIS in a VFR plane but that's my soapbox talking. When I made full size paper dolls of the MX1 and put them on my panel, which is oddly just a few inches wider than the Citabria panel, they seemed like they would be okay. It was all the features like built in GPS, air data, AoA, autopilot, AHARS which eliminate a lot of wire bundles and black boxes (the things that caused the Garmin/Dynon shopping cart to blow up from $4k to $25k) that became a selling feature.

The final straw was when I considered engine monitoring. Stand alone engine monitors are expensive and cannot serve as a backup should a primary display fail. And because of my 7 cylinder configuration they all required me to have two expensive modules to accept the data. With the MGL RDAC system I mount one box on the engine side and only one wire penetrates the firewall. Connections are easy to all of the sensors I will be running.

Lastly, the ability to fully customize my own displays to eliminate clutter of unused features, change colors and sizes of every feature on each page of the display was all I needed to get my wallet out.
 

aftCG

Well-known member
Joined
Apr 3, 2018
Messages
526
Location
Tacoma, WA
I finally made it through the measuring, drilling, bonding and riveting part of rigging my wings. They are attached and rigged correctly. Lots more work to do but I just found out a few days ago that my Verner radial is in production right now and will head to the test cell soon.
PXL_20210612_222514612.jpg
PXL_20210612_223206040.jpg

I've also been busy designing my instrument panel using Solidworks, courtesy of my EAA membership. I even managed to insert the custom screens I've worked on for my MGL displays.
Kitfox N527KF Instrument Panel Assembly.JPGKitfox N527KF Instrument Panel Assembly 3.JPG
Kitfox N527KF Instrument Panel Assembly 4.JPG