Ceconite rejuvenation

Bruce

Well-known member
Joined
Dec 22, 2018
Messages
439
Location
Knoxville TN
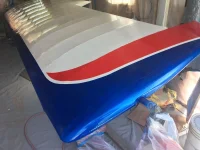
Recommendation is to get the stripping tape it looks plastic, I bought it 1/4 wide after I had stripes masked in I overlapped it by 1/8 on masking tape 1/8 on painted surface and shortly after painting pulled it off at a 45 towards the painted surface and have a great crips line the other thing was somewhere they recommended folding over at the end from where you want to pull from it gives something to grab
 

Attachments

Big Ed

N50247 - '79 Super D
Joined
Jul 20, 2020
Messages
1,938
Location
Tampa, FL
Good tips, thanks. The other recommendation I got for crisp lines is to spray a coat of clear before shooting the stripe color. That seals the edge, so any bleed-under will be clear.

I don't have clear, I have the brown tinted, but it supposedly dries clear. If I decide to postpone the striping until after SnF, I will probably order the clear clear.
 

Bruce

Well-known member
Joined
Dec 22, 2018
Messages
439
Location
Knoxville TN
Keep in mind I’m using the Stwart system. Lighting is important for final spray I think this is where I’m missing the final finish also I have learned to keep rubbing alcohol handy to clean my glasses as I go other wise they fog over from overspray. Keep in mind it’s all a learning if I do another plane it will look much better, not that I’m disappointed with what I am getting. Last item is the bunny suite and respirator must have items one for health the suite because the overspray is sticky.
Enjoy sun and fun, I was going but my travel partner backed out so it’ll be Air venture for me this year.
 

Big Ed

N50247 - '79 Super D
Joined
Jul 20, 2020
Messages
1,938
Location
Tampa, FL
Spot sanding and final coats of silver done. Looks pretty good IMO. Hope to shoot base coat of white tomorrow morning.
PXL_20210415_023539721.jpgPXL_20210415_023500529.jpg
 

Bartman

Administrator
Staff member
Joined
Mar 27, 2018
Messages
3,696
Location
New Jersey, USA
Really glad to see you turned the corner with it Ed. Looking forward now to seeing you make progress through the Intermediate known sequence! :yesss:
 

Big Ed

N50247 - '79 Super D
Joined
Jul 20, 2020
Messages
1,938
Location
Tampa, FL
Painted white base coat. Looks great for the most part. Had to add retarder to prevent blushing, which caused a few runs on left side. May or may not try to sand those out before painting yellow.

PXL_20210415_224701101.jpg
PXL_20210416_001051465.jpg

Had hoped to paint yellow tomorrow, but stencils have not arrived yet. :mad: Trying to decide whether to do some kind of expedient means, or just wait.
 

Hiperbiper

Well-known member
Joined
May 30, 2020
Messages
680
Location
Shreveport Louisiana DTN
You can always make a "license plate" out of plastic (think yard sign material), put your n number on it and tape it to the side of the plane until you get the stencils...
 

Big Ed

N50247 - '79 Super D
Joined
Jul 20, 2020
Messages
1,938
Location
Tampa, FL
You can always make a "license plate" out of plastic (think yard sign material), put your n number on it and tape it to the side of the plane until you get the stencils...
Are you being facetious or serious?

I was seriously considering buying 2" white vinyl tape and putting a temporary N Number on the side until the stencil arrives. But that method is clearly and explicitly prohibited by the FAA in AC 45-2E. If someone knows a loophole there, I'm all ears!
 

Hiperbiper

Well-known member
Joined
May 30, 2020
Messages
680
Location
Shreveport Louisiana DTN
Are you being facetious or serious?

I was seriously considering buying 2" white vinyl tape and putting a temporary N Number on the side until the stencil arrives. But that method is clearly and explicitly prohibited by the FAA in AC 45-2E. If someone knows a loophole there, I'm all ears!
Sorry Ed, I should have stuck a smiley in there somewhere...
 

Bob Turner

Well-known member
Joined
Apr 4, 2018
Messages
2,826
What year is your Decathlon? If 35 years old you do not need much. And if vinyl stick-ons are legal, surely so is tape. I have a piece of shirt cardboard with my N- number cut out stencil-style. That, and a rattle can, and I am legal.

Edit: Ed is right. No tape, and probably no vinyl:


7.4.1 You are required to apply the N-number in a permanent way. Use paint that needs thinners or strippers to remove it, or use decals. Do not use tape that can be peeled off and do not use water-soluble paint, such as poster paint.
 
Last edited:

Tangogawd

Well-known member
Joined
Sep 13, 2020
Messages
195
Location
Alaska
I says decals, I would say go to a local vinyl shop and see if they can cut you some real quick. better yet, get an eight year old to finger paint in on! that would be fun!
 

Hiperbiper

Well-known member
Joined
May 30, 2020
Messages
680
Location
Shreveport Louisiana DTN
I used vinyl letters/numbers on my Navion when I got it's new n-number.
If they ever come off the paint underneath is coming too!
One other thing; be really careful to get the centering and direction of the numbers right before you squirt paint or stick decals.I've seen a couple of paint jobs messed up (one recently) that had the numbers "going uphill" on one side and "downhill" on the other. Problem was the guy thought he had both centered...

Chris
 

Big Ed

N50247 - '79 Super D
Joined
Jul 20, 2020
Messages
1,938
Location
Tampa, FL
That's one thing I am confused about. I ordered the slanted number strip. One set slants left, while the other slants right. What is the purpose of the slant? Is it so that the numerals appear vertical when the aircraft is in the 3 point stance during taxi? In that case, the tops of the letters on both sides would lean forward, correct?
 

Hiperbiper

Well-known member
Joined
May 30, 2020
Messages
680
Location
Shreveport Louisiana DTN
If you peruse this forum (specifically this area) you'll find pics of slanted numbers on Citabra's. On most the numbers rake aft from the bottom (like a tree blowing in the wind) and that works well with the back edge of the side window...
The trick is to find the fuselage centerline and not try to measure from the top or bottom of any point on the fuselage. Your stencil should have a centerline marked on the it. Align the centerline marked on the fuselage (I use a chalk line) with the centerline of your number stencil then stand back about 10 feet and see how it looks to you!
It does help if you can prop the tail up to simulate level flight...

Chris
 

Big Ed

N50247 - '79 Super D
Joined
Jul 20, 2020
Messages
1,938
Location
Tampa, FL
If you peruse this forum (specifically this area) you'll find pics of slanted numbers on Citabra's. On most the numbers rake aft from the bottom (like a tree blowing in the wind) and that works well with the back edge of the side window...
The trick is to find the fuselage centerline and not try to measure from the top or bottom of any point on the fuselage. Your stencil should have a centerline marked on the it. Align the centerline marked on the fuselage (I use a chalk line) with the centerline of your number stencil then stand back about 10 feet and see how it looks to you!
It does help if you can prop the tail up to simulate level flight...

Chris
I will be laying out the fuselage center line for stripes, so that will be easy. Looks like the base of the numbers is 2 inches above the top of the stripe. From this photo, appears the numbers slope aft from the top, relative to the fuselage center line.

PXL_20210327_072805447.jpg
 

Big Ed

N50247 - '79 Super D
Joined
Jul 20, 2020
Messages
1,938
Location
Tampa, FL
Did the light test last night after spot sanding, and found several problem areas, mostly along the edges of the 1" tapes. If anyone else reads this thread, I do not recommend using the Spruce 1" ceconite tapes. The edges crinkle when glued and won't lie flat, which makes it very difficult to get a good seal with silver. Hopefully have enough buildup now to seal the edges. Plan to spot paint silver and redo the light test, then proceed with white and color. Awful humidity thru Weds morning, so will wait until cold front pushes through that afternoon, and then hopefully finish this project on Thurs and Fri. Maybe by then my stencil strip will arrive.
 

Bob Turner

Well-known member
Joined
Apr 4, 2018
Messages
2,826
I have never used 1" tapes, so cannot address your specific problem. I always try to seal the pinked edges with heat after a couple coats of clear, and wet-sand after the first silver coat. Small imprrfections turn up at every coat, but overall you do not want to mess with sandpaper for at least the last two silver coats, and if you sand the first coat of white, use care to not cut through to silver.
 

Big Ed

N50247 - '79 Super D
Joined
Jul 20, 2020
Messages
1,938
Location
Tampa, FL
Pinked edges layed down and sealed no problem. So did the 2" tapes. The 1" straight edge tapes pinched about every half inch, leaving a tiny peak that pulls away from the fabric. I ironed the heck out of them, but the edges would not lay flat. I sanded after several coats of clear, but all that did was fray the threads where they stood up.

The silver was apparently not viscous enough to bridge the gap between the tape and the fabric at the little peaks. On the top of the tape, it ran down into the gap and filled it. On the bottom, it left a little air gap that lets light in. Gonna touch-up spray the bottom tape edges with a direction of spray from below the edge. I think that should fix it. Minor issue.