Bruce 79 ECA recover

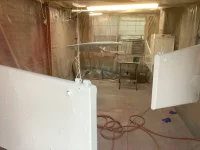
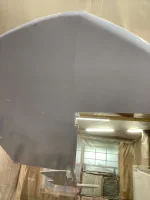
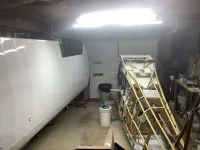
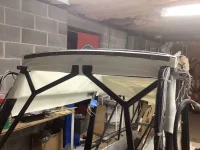
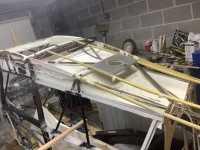
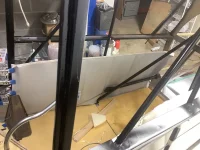
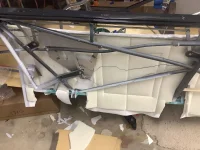
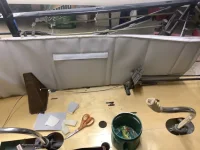
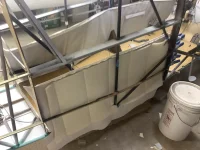
Hello to everyone, my first attempt at shooting Stwarts system paint. Turned out better than I expected and I thought I’d share the photos, and share some experience. First thing I’m gonna say is pay attention to the instructions, I highly recommend you don’t let the overspray flow out where you do not want to change the color of. As you can see from the photos my paint booth the exit for the air turned red the grass outside the door area turned red But not the concrete and I think the most important take away is you need to paint suit because not only did they turn my legs red, and sneakers but it was all in my hair. So next to invest in a paint suit Then if you wear glasses they get fogged over. F53D39F6-F407-40D5-8BAA-E7CCE5BB27CC.webpA58B9B43-A0BB-45DD-A66F-91B8D125DCE8.webp25BF07F3-54FC-45E7-8A07-9DB384B9DA42.webp34555068-6647-4D3A-8F13-14E338C4B2C3.webp2BC4FD50-5A6B-44DA-BA8A-B8AC664BED3A.webp with color. Also the cleans up really well with rubbing alcohol.
 
My buddy gets gorgeous results on small pieces. It was the big surfaces that gave him fits. I think he is happy; it will be a good looking Cub at ten feet.
 
being my first run at it i did get some runs, and the cure time between coats was faster than I thought. but its 80 and high humidity also reading on supercub form they are saying to paint one side of the wing at a time, which considering this experience makes sense because it seem to cure so quick. I shot the spades, landing gear, and once I had them done I did the struts. I started with 325 grams of the base and mix when I was done had about a teaspoon left. time through the ford cup was 22 seconds.
 
It's looking good Bruce.
Go to your local auto paint store and ask them for after paint cleanup liquid/creme.
I buy stuff labeled "Cupren" but it's marketed under lots of names. Makes cleaning hand, arms etc. easy and safe.
A Tevek body suit is a good idea no matter what paint you're shooting. $10.00 or so from Home Depot or Lowe's.

Again, looking good!

Chris
 
Truth is I jumped in the shower after cleaning up the gun and such and being water base it all washed off. even my hair which was like a thick coat of hair spray. Just checked and its still tacky 5 hours later but no bubbles blisters or sags I was afraid I rushed the coats. had to keep telling myself saying fog it on not a heavy wet coat and the final coat went on heavy nice shine so far. Can't believe it carried in the air like it did and got the side of my house which the wife so kindly pointed out, 🐶🏚 as soon as she pulled in the driveway.
 
the tyvek suit helped a lot but everything that wasn't covered ended up with paint on it including my glasses which I had to wipe off with alcohol every five or ten minutes.

won't explain how but the outside of one garage door was pink after I did the trim on the fuselage, the ground below the door is still pink.

Looking good Bruce!
 
I'm lucky in regards to a place to paint...in the last two months I've sold both my Super Viking and the Navion so my plan is to move the Hiperbipe into my work (large) hangar and clean and drape my small hangar for use as a paint booth. I'll need to get the venting right to control the overspray and light the place better but if I turn the whole place red no one will care...
We just finished painting an RV 9 in the hangar next door so I even have access to fixtures to hang all the small parts from.
Chris
 
Weelll you asked for progress pictures, I have taken a short trip west so today I’m in Montana so this is my picture so enjoy so no progress back to it in t more weeks 😁F2A82EC0-EFE1-4DF9-A56C-1CA5995FBC88.webp46210017-5716-4674-B230-437CF3E48A6A.webp46210017-5716-4674-B230-437CF3E48A6A.webp
 
It’s been a while since I’ve been on the post I took a trip out to Wyoming for about eight weeks aircraft Spruce redid my headliner wile I was gone that was not made correctly, so today I went to install it everything looked much better until !!!! I was stapling in the center section as I’m fitting everything I noticed that the material that goes by the fuel Gauges were sewn into low so I had to remove what I had attached so far so glade no glue had been applied yet. I think I’ll go to a local upholstery shop and see if I can get them to move them up about 4 inches I attached pictures I guess the moral of the story is lay everything out before you start the job and reinspect it three times. Then I suggest going to a different supplier for this than aircraft Spruce. I did call the service department the girl I was dealing with is on vacation and I went to voicemail with the other service rep.
 

Attachments

  • B9324386-32A4-4DA6-AFFA-C6708516223C.webp
    B9324386-32A4-4DA6-AFFA-C6708516223C.webp
    207 KB · Views: 37
  • DDF9400E-2C42-4849-BED1-042538378104.webp
    DDF9400E-2C42-4849-BED1-042538378104.webp
    223.1 KB · Views: 38
that is so annoying!!! sorry to hear it. the weeks that go by as we deal with problems like this, so annoying!
 
My second run with Stwarts paint I learned some things,
It takes over 3 hours of cure to skin over before bugs stick.😢
The first 2 coats are hard to see and if you wear glasses have rubbing alcohol and rag ready to clean them.
There is no rushing between coats Nor any reason to rush (some peace’s were tacky sooner than others)
By the forth coat it looks great. Very happy with results. Next are ailerons then I hope wings depending on weather I have looks like it will be next year before we’re flying this one.

by the way I have a fan pushing air into boot through filters which keeps bugs out I ran this 2 hours after last coat then opened plastic door thinking it was cured enough 😨wrong for me temp was low 70 with high humidity (70%)
 

Attachments

  • A1CE6D36-F6BC-4373-8C09-E9B45F9BD5A9.webp
    A1CE6D36-F6BC-4373-8C09-E9B45F9BD5A9.webp
    88.9 KB · Views: 32
  • C9211264-9455-458B-AC8C-3C1EBD12AC5C.webp
    C9211264-9455-458B-AC8C-3C1EBD12AC5C.webp
    92.7 KB · Views: 32
  • 20DE77C3-2969-4491-81AB-E043B2F6B406.webp
    20DE77C3-2969-4491-81AB-E043B2F6B406.webp
    1.4 MB · Views: 29
  • 96E02408-078C-40B6-A76F-B4C81152936D.webp
    96E02408-078C-40B6-A76F-B4C81152936D.webp
    77.5 KB · Views: 34
I'm Back to working on the project, I have been struggling with the headliner and finally broke down and ordered one from Airtex. WOW what a difference in workman ship. I have removed the one from Spruce and placed it in the burn pile. Now I have placed the new one in and looks 10 times better. BUT I have a sky light and I a trying to remember how this was placed before I start nailing things in place has any one have good pictures of there's installed would be good or if you are recovering I thought I took pictures as I removed it but alas I am unable to fined them.

Thanks for any help in this or if you have experience and want to join the fun come on down.
 
Happy new year to all, it’s been a wile since reporting any progress so after getting the headliner from airtex it went in so much better now to I’m waiting on the windshield and skylight then the envelope. I thought it would take longer to get the envelope but within 4 days from order it was sitting at my house. So I’m fitting the wall panels waiting on the skylight. I’m hopping to be ready for more paint work as soon as it warms up.
 

Attachments

  • A81E7E4A-4CC9-4195-8FE4-2BAE9A308337.webp
    A81E7E4A-4CC9-4195-8FE4-2BAE9A308337.webp
    109.7 KB · Views: 30
  • 5BC775AA-4DE3-4B4E-913E-CF7CD20DA846.webp
    5BC775AA-4DE3-4B4E-913E-CF7CD20DA846.webp
    133.2 KB · Views: 30
  • 905B913B-93E3-44BC-B038-DA11FE1EEA4B.webp
    905B913B-93E3-44BC-B038-DA11FE1EEA4B.webp
    74.3 KB · Views: 32
  • 1679FC38-2241-46F9-BC8D-13DE8D6180CF.webp
    1679FC38-2241-46F9-BC8D-13DE8D6180CF.webp
    118.1 KB · Views: 33
  • 468729A8-44F4-46FE-8559-B3A1B2AEED7F.webp
    468729A8-44F4-46FE-8559-B3A1B2AEED7F.webp
    114.4 KB · Views: 38
  • F8A77D5E-9C14-48BC-A33E-C2A283A54142.webp
    F8A77D5E-9C14-48BC-A33E-C2A283A54142.webp
    140.2 KB · Views: 38
This is time consuming, I was going to wait and fit after it was covered and painted. I believe that would have been a mistake.
 

Attachments

  • image.webp
    image.webp
    149.4 KB · Views: 33
  • image.webp
    image.webp
    78.8 KB · Views: 32
  • image.webp
    image.webp
    151.7 KB · Views: 29
  • image.webp
    image.webp
    109.9 KB · Views: 30
  • image.webp
    image.webp
    119.3 KB · Views: 31
  • image.webp
    image.webp
    127.3 KB · Views: 33
Can I get some help with a part number for these clips only part # I can find is called a snap fastener #2275
 

Attachments

  • BC9A9D79-2834-4817-8D2E-CD797B66D7BA.webp
    BC9A9D79-2834-4817-8D2E-CD797B66D7BA.webp
    45.2 KB · Views: 31
Ups came by😁 now to fit skylight and start the fabric. I wish they would have included the drill bit with the windshield and sky light.
 

Attachments

  • 404AA81E-F206-43D9-86C9-CBE57E96EC0F.webp
    404AA81E-F206-43D9-86C9-CBE57E96EC0F.webp
    302.8 KB · Views: 27
Can I get some help with a part number for these clips only part # I can find is called a snap fastener #2275
Are those the little buggers at the top of the battery panel cover? I'll be darned if I can figure out how to make those work. Squeeze the ends and insert in hole?
 
The clips are for the interior holds in back panel and of panels by your arm as well as the top panels above the rear windows.

As for drill bit the windows are LP aero and recommend this drill bit cut. But no better than I am at grinding the drill bits I’m just going to buy one.

So the goal is fit the skylight then remove it and install the envelope, reinstall skylight and hope it warms up to get back to finishing base color on paint.
 

Attachments

  • image.webp
    image.webp
    264.8 KB · Views: 26
Back
Top